Source: http://lalit7jain.blogspot.in/2013/06/complete-guide-to-wds-windows.html
Setting up WDS Server in Windows Server 2012
The following are requirements for installing this role, depending on whether you choose the default installation (both Deployment Server and Transport Server), or only the Transport Server role service
- Active Directory Domain Services (AD DS): A Windows Deployment Services server must be a member of an Active Directory Domain Services (AD DS) domain or a domain controller for an AD DS domain.
The AD DS domain and forest versions are irrelevant; all domain and forest configurations support Windows Deployment Services.NOTE: AD DS is not required if the WDS server is configured in Standalone mode.- DHCP: You must have a working Dynamic Host Configuration Protocol (DHCP) server with an active scope on the network because Windows Deployment Services uses PXE, which relies on DHCP for IP addressing.
- DNS: You must have a working Domain Name System (DNS) server on the network before you can run Windows Deployment Services.
- NTFS volume: The server running Windows Deployment Services requires an NTFS file system volume for the image store.
- Credentials: To install the role, you must be a member of the Local Administrators group on the server. To initialize the server, you must be a member of the Domain Users group.
Install Windows Deployment Services
- Sign in to the server as a member of the local Administrators group.
- Server Manager will start automatically. If it does not automatically start, click Start, type servermanager.exe, and then click Server Manager.
- Click Manage.
- Click Add roles and features, click Next.
- On the Before you begin page of the Add Roles and Features Wizard, click Next.
- On the Select installation type page, click Role-based or feature-based installation, and then click Next.
- On the Select destination server page, select the appropriate server, and then click Next. The local server is selected by default.
- On the Select server roles page, scroll down and then select the Windows Deployment Services check box. Click Next.
- Remote Server Administration Tools are required to manage this feature. Select Include management tools (if applicable). Click Add Features. Click Next.
- On the Select features page, click Next.
- On the Select role services page, select the role services to install for Windows Deployment Services. If you wish to install both the Deployment Server and Transport Server, leave these role services selected. Click Next.
- On the Confirm installation selections page, click Install.
- Windows Deployment Services will now be added to the server. Installation progress will now be illustrated in the Add Roles and Features Wizard.
Steps for configuring Windows Deployment Services for Standalone Server
- Log on to the server as a member of the local Administrators group.
- Server Manager will start automatically. If it does not automatically start, click Start, type servermanager.exe, and then click Server Manager.
- Click Tools, and then click Windows Deployment Services to launch the Windows Deployment Services MMC-snap (or console).
- In the left pane of the Windows Deployment Services MMC snap-in, expand the list of servers.
- Right-click the desired server, click Configure Server.
- On the Before you begin page, click Next.
- On the Install options page, choose Integrated with Active Directory.
- On the Remote Installation Folder Locations page, choose the default path or enter your own path to the remote installation folder. Click Next.
Note: If your server is running as a DHCP Server, you will see the Proxy DHCP Server page.Select Do not listen on DHCP and DHCPv6 ports and Configure DHCP options for Proxy DHCP. Click Next.- On the PXE Server Initial Settings page, choose desired option to define which client computers this server will respond to. Click Next. This will complete the configuration of Windows Deployment Services.
- When the configuration is completed, click Finish.
- If you want to modify any of the settings of the server, right-click the server in the MMC-snap in, and click Properties
Steps for Adding Images
You must add at least one boot image and one install image before you will be able to boot to the Windows Deployment Services server and install an image.- Boot images. Boot images are Windows PE images that you boot a client computer into to perform an operating system installation. In most scenarios, you should use the Boot.wim file from the installation media (in the \Sources folder). The Boot.wim file contains Windows PE and the Windows Deployment Services client.
- Install images. Install images are the operating system images that you deploy to the client computer. You can also use the Install.wim file from the installation media (in the \Sources folder), or you can create your own custom image
- In the left pane of the Windows Deployment Services MMC snap-in, right-click the Boot Images node, and then click Add Boot Image.
- Browse to choose the default boot image (Boot.wim) on the Windows installation media, located in the \Sources folder.
- Click Open, and then click Next.
- On the Image Metadata page, enter the desired image name and description. Click Next.
- On the Summary page, click Next
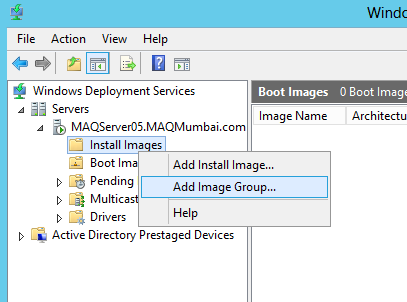
To add the Install images- In the left pane of the Windows Deployment Services MMC snap-in, right-click the Install Images node and then click on Add Image Group and create a group name
- Open the RemoteInstall folder created in Step No.8 of Configuring WDS
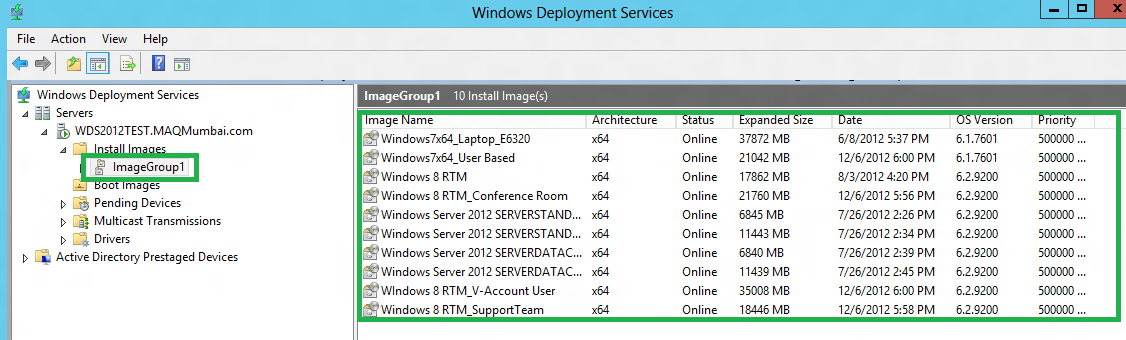
- Navigate to the Images, Image Group name and paste the customized install.wim images which you have created for deploying the operating system
- Now open the WDS console and you can see all the images appearing under the Image Group section as shown
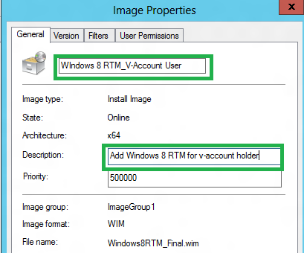
- Right click on any Image name and go to Properties, here you can name your Image and give description to the image. Click on Apply and OK
Installing an Operating System on Machines using WDS
After you have at least one boot and one install image on the server, you can deploy an install image
- The client computer must be capable of performing a PXE boot.
- The client computer must have at least 512 MB of RAM, which is the minimum amount of RAM for using Windows PE.
- The client must meet the system requirements for the operating system of the install image.
- Configure the BIOS of the computer to enable PXE booting, and set the boot order so that it is booting from the network first.
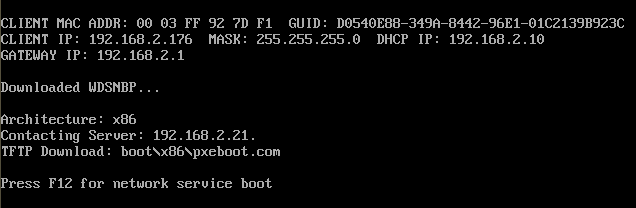
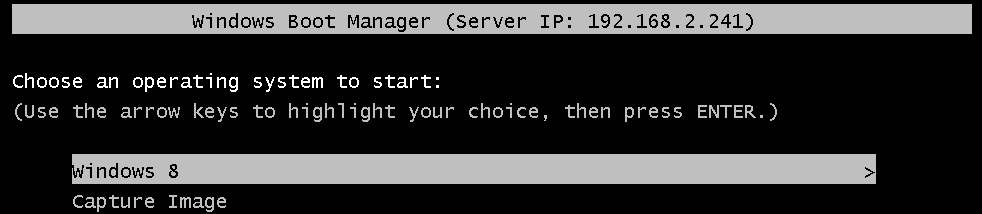
- Restart the computer, and when prompted, press F12 to start the network boot.
- Select the appropriate boot image from the boot menu. (This boot image selection menu will be available only if you have two or more boot images on the server).
- At the Install Windows page, choose your Locale and Keyboard or Input Method. Click Next.
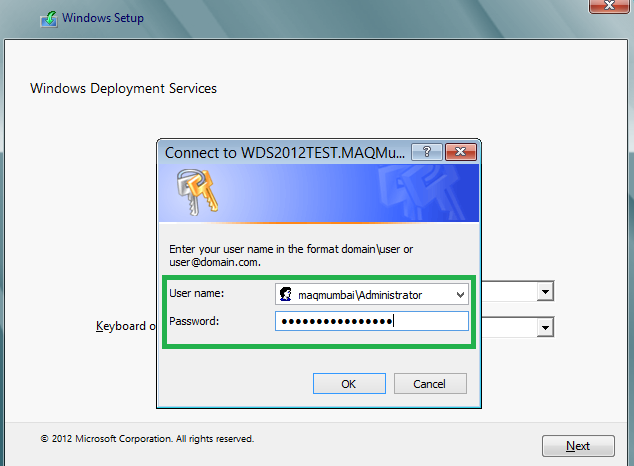
- At the Connect to Your WDS Server authentication dialog, enter your local user account and password. Click OK.
- At the Install Windows dialog box, select the operating system you wish to install. If you only have one operating system to install, choose that and clickNext.
- If prompted at the Where do you want to install Windows page, select the partition you wish to install the operating system on. Click Next.
- When the installation is completed, the computer will restart and Setup will continue.
Steps for creating a Capture Image
To create an install image, you must first create a capture image.- Capture images are boot images that you boot a client computer into to capture the operating system into a .wim file.
- You can also create media (a CD, DVD, USB drive, or other type of media) that contains a capture image, and then boot a computer from the media. These images provide an alternative to the command-line utility, ImageX.exe. Except in advanced scenarios, you can create a capture image by using the Boot.wim file from the Windows installation media
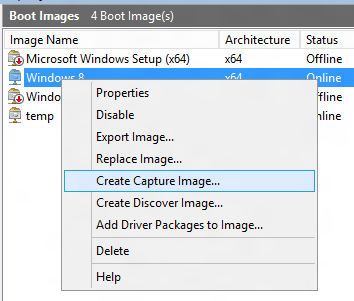
- In the Windows Deployment Services MMC snap-in, expand the Boot Images node.
- Right-click the image to use it as a capture image. In most cases, you can just use the Boot.wim file from the installation media.
- Click Create Capture Image.
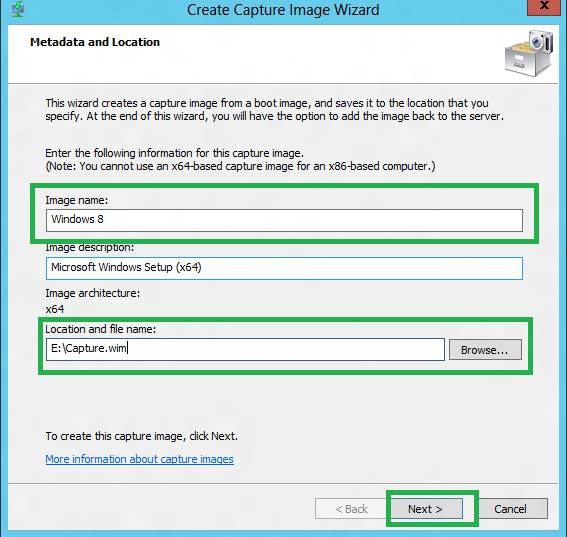
- Type in your Image Name, Image Description, and the location and file name where you want to save a local copy of the file. You must specify a location in case there is a problem with the network when you deploy the capture image. Click Next.
- Allow the Create Capture Image Wizard to complete.
- Tick Add Image to the Windows Deployment Server now. Click Next
- Enter the location of the Windows Image file that contains the images. Click Next.
- Enter your Image Name and Image Description. Click Next.
- On the Summary page, click Next.
- Click Finish.
Capture an sysprep machine using WDS
Now that you have a capture image, you need to prepare a reference computer and then create the install image. The reference computer can be a computer with a standard Windows installation or a Windows installation that has been configured for your environment. First, you boot a computer (which has been prepared with Sysprep) into the capture image. Then a wizard creates an install image of the reference computer and saves it as a .wim file. After that, you can deploy the .wim file to a computer.- Create a reference computer (install the operating system, applications, and make any other changes that you want).
- Ensure that you have the correct version of Sysprep.exe on the computer.
- At a command prompt on the reference computer, change folders to \Windows\System32\Sysprep or the folder that contains Sysprep.exe and Setupcl.exe.
- Type one of the following:
- On computers running Windows 8, Windows 7, Windows Vista and Windows Server 2012, Windows Server 2008 R2 and Windows Server 2008, run the command sysprep /oobe /generalize /reboot. If you prefer, you can also use the Sysprep graphical user interface by double-clicking Sysprep.exe.
- On computers running Windows XP, run sysprep -mini –reseal -reboot.
- When the computer restarts, perform a network boot on the computer by pressing F12.
- In the boot menu, select the capture boot image that you created in the preceding procedure, and then press ENTER.
- You will be presented with the Windows Deployment Services Image Capture Wizard. Click Next.
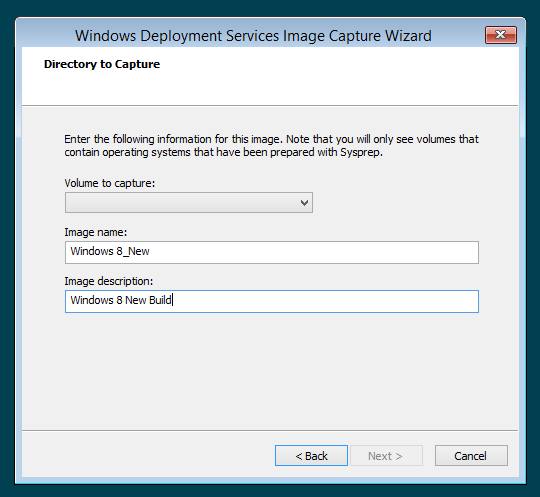
- On the Directory to Capture page, select Volume to capture, enter your Image name and Image description. Click Next.
*Important
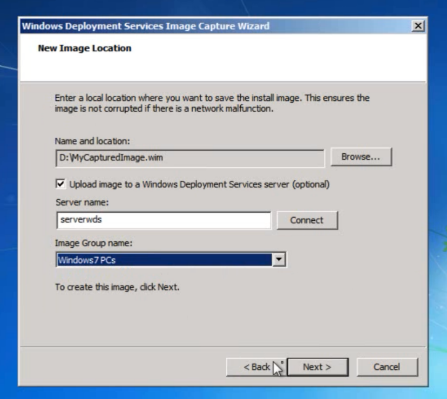
Referring to Volume to capture, you will see only drives that contain operating systems prepared with Sysprep. If you do not run the command in step 4, you will not see any drives to capture.- Click Browse next to Name and location and browse to a local folder where you want to store the captured install image. Type a name for the image, using the .wim file name extension, and then click Save. Note that this location can be a mapped network drive.
*Important
You must enter a local location to save the new image; otherwise, you will not be able to capture the image. This requirement is enforced to avoid image corruption if there is a network malfunction.- Select the Upload Image to a Windows Deployment Services check box.
- Click Connect. If prompted for credentials, provide a user name and password for an account with permissions to connect to the Windows Deployment Services server.
- Select your Image Group Name. Click Next. The wizard will now complete and create a custom installation image and store it in the Windows Deployment Services store.
- Click Finish
Steps for creating a Discover Image
Why Discover Image?- If you have a computer that is not PXE enabled, you can create a discover image and use it to install an operating system on that computer. Otherwise, you can skip this section.
- When you create a discover image and save it to media (a CD, DVD, USB flash drive, or other type of media), you can then boot a computer to the media.
The discover image on the media locates a Windows Deployment Services server, and the server deploys the install image to the computer. You can configure discover images to target a specific Windows Deployment Services server. This means that if you have multiple servers in your environment, you can create a discover image for each one, and then name them based on the name of the serverRequired items:- A 1GB USB Flash drive or greater is required for this recipe
- The Windows 8 RTM ISO File or DVD (ISO Preferred)
- A PC Running Windows 8 Release Preview or RTM
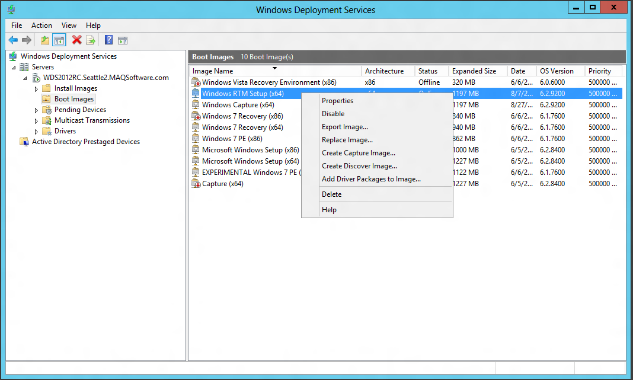
- In the Windows Deployment Services MMC snap-in, expand the Boot images node.
- Right-click the image you want to use as a discover image.
- Click Create Discover Image
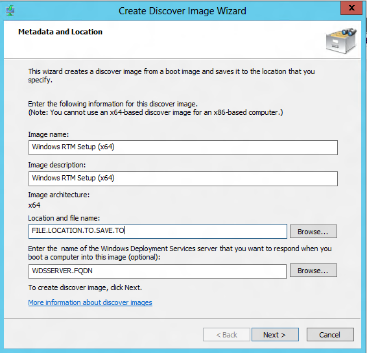
- In the Metadata and Locations page, enter your Image Name and Image Description. In the location and file name, click Browse and select the location for storing your discover boot image. Enter the name of your discover image. Optionally, enter the name of your Windows Deployment Services server that you want to respond when you boot a computer into this image. Click Next.
- Click Finish.
- Start an Administrative Command Prompt
- Type “cd \” and press Enter
- Type diskpart
- Follow the example below. Please note you will need to discover which disk number belongs to your flash drive. Observe the “List disk” command and use drive size to find which drive is your USB flash drive.
- Please use the below diskpart session as the your guide to preparing the USB flash drive
DISKPART> list diskDisk ### Status Size Free Dyn Gpt-------- ------------- ------- ------- --- ---Disk 0 Online 1863 GB 0 BDisk 1 Online 3828 MB 0 BDISKPART> select disk 1Disk 1 is now the selected disk.DISKPART> cleanDiskPart succeeded in cleaning the disk.DISKPART> create part primaryDiskPart succeeded in creating the specified partition.DISKPART> select part 1Partition 1 is now the selected partition.DISKPART> format fs=fat32 quick label=WDSUSB100 percent completedDiskPart successfully formatted the volume.DISKPART> assign letter=uDiskPart successfully assigned the drive letter or mount point.DISKPART> exitLeaving DiskPart...- Now you need to mount the Windows 8 ISO file (by right-clicking the ISO and saying “Mount”) or inserting the Windows 8 DVD.
- For this we will assume the DVD drive letter for this disc is E:
- Using the same command prompt window from diskpart you will be running a copy command to copy the needed files.
- Please note Drive letter U: is my USB Flash Drive and drive letter E: is the DVD drive or Mounted ISO file.
- Type into the Administrative Prompt: robocopy E:\ U:\ /E /S /XF Install.WIM /XF Boot.WIM
- Once this is done then browse to U:\sources\ and copy your WDS Dicscover WIM file into this folder
- Rename the WDS Discover WIM file in U:\sources\ to boot.wim
- Boot the client computer to the media. You may need to change the boot order in the client BIOS to do this. When the client boots to the media, your experience will be exactly the same as if you had booted to the network
Setting up Multicast Transmission
Multicast transmissions enable you to deploy an image to a large number of client computers without overburdening the network.When you create a multicast transmission, the image is sent over the network only once, which can drastically reduce the amount of network bandwidth that is used. Note that data is transferred only if clients request data
- Routers that support multicasting.
- At least one install image that you want to transmit on the server.
- The Boot.wim file from the latest version of Windows Server (Windows Server 2012).
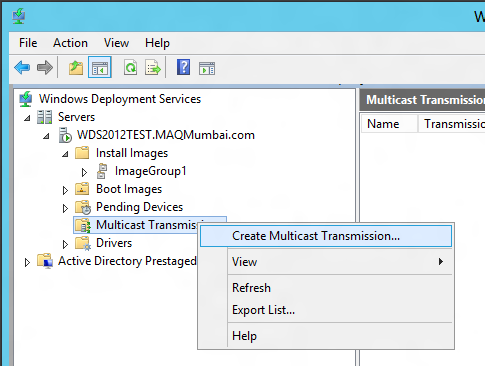
- Right click ‘Multicast Transmission’ and click Create Multicast Transmission
- Type a name and click Next
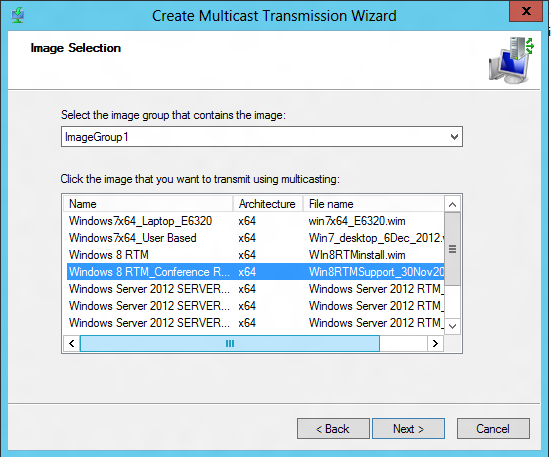
- Select the image that you want to transmit using multicasting and click Next
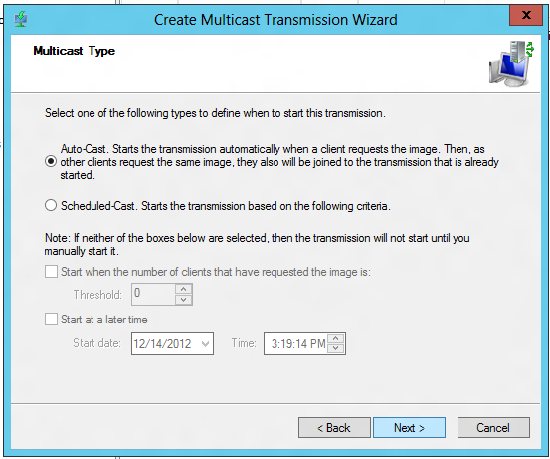
- Select Auto-Cast option and click Next
- Click Finish to complete the process
- We can check the status as below
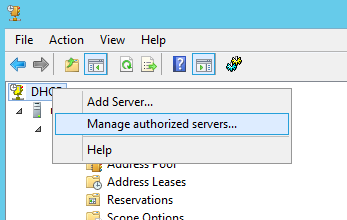
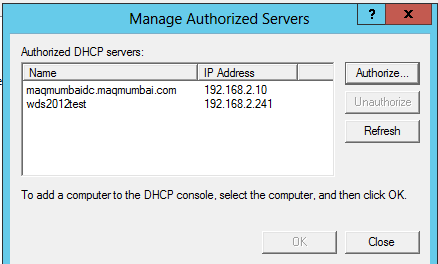
Note: We need to authorize the WDS server in DHCP for the clients to recognize. Step 25 and 26 describes the procedure- Open your local DHCP server and right click the DHCP and select Manage authorized servers
- In the next window, click ‘Authorize’ and enter the IP of WDS server
- WDS server is ready for deployment


No comments:
Post a Comment